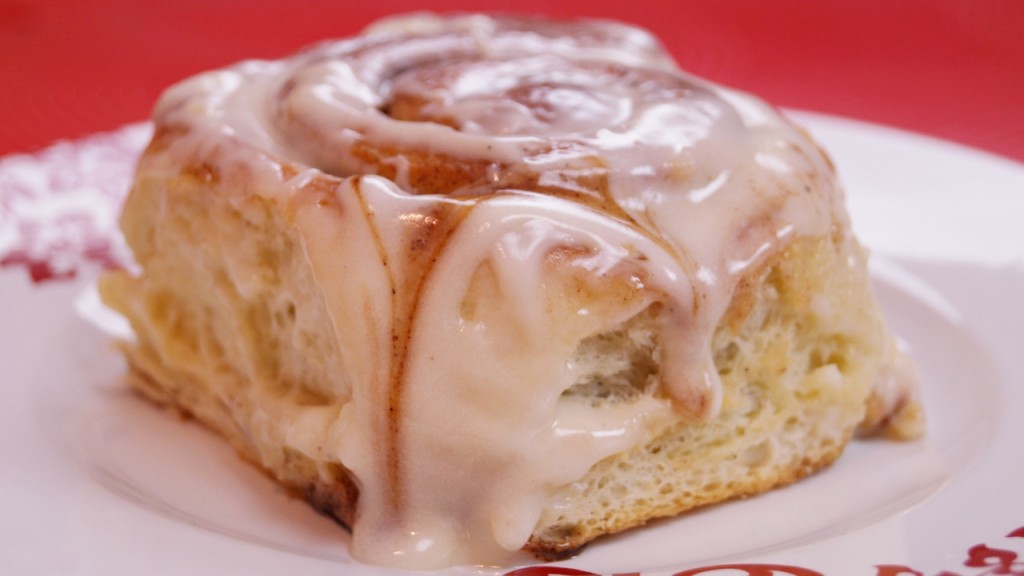
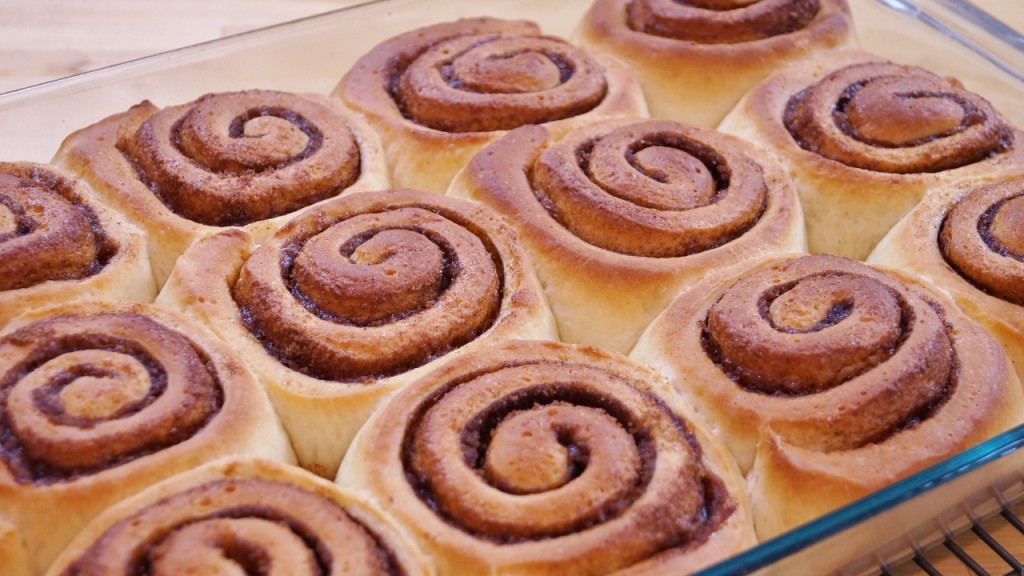
Beef and Cheese Lasagna

Classic Meat & Cheese Lasagna Recipe

Classic Meat and Cheese Lasagna Recipe

Lasagna Recipe! A Classic Italian dish! This recipe for Beef and Cheese Lasagna (lasagne) is made with a ricotta cheese filling (I use 3 cheeses) and a thick, rich, meat sauce (“ragu”). I use lean ground beef in this recipe, but have used pork or Italian sausage for the meat sauce, especially when I make a Bolognese sauce, but for Christmas I make it without sausage because not everyone eats pork or likes sausage.  Lasagna originated in Naples, Italy, but you don’t have to be Italian to make a great lasagna! The world over, people love Lasagna and there are endless versions of this classic Italian dish made with béchamel (white sauce), marinara sauce, seafood, chicken, cheese and vegetables.  Vegetable lasagna (vegetarian) is another one of my favorites with spinach, cheese and a béchamel sauce and with mixed vegetables, cheese and a red sauce (marinara).  The noodles and cheeses are in there no matter what, so they’re all delicious.  I mean really, how can you go wrong with pasta and cheese. It’s what makes lasagna so incredible and why soo many people love it!

Lasagna is an Italian-American family favorite for Christmas, but it perfect for any holiday and one of the best comfort food recipes! Who can resist a hearty, three cheese lasagna recipe?  You heard me right! 3 cheeses: ricotta cheese, mozzarella cheese and parmesan cheese! Sheets of lasagna noodles layered with a 3 cheese filling, and a thick, rich, meat sauce.  The whole thing gets topped with more cheese and baked in the oven until it’s hot and bubbly!  Mmmm.  Extra sauce is must for serving, so I made sure you get plenty of sauce with this recipe and then some.  If I spend over 2 hours cooking something, I feel like I deserve to have some leftovers, don’t you?  You can freeze the extra sauce and enjoy your efforts another day, so don’t get alarmed when you see a lot leftover, you’ll be happy when you make another meal from it when you’re in a pinch.   I always say “too much is better than not enough”! I also say “all things in moderation”, so lasagna falls under both sayings.    😉

You can also make lasagna ahead and freeze it, which can really make life easy during the holidays. Simple ingredients and one of the best Italian recipes ever! The best lasagna recipe in the world!  Haha  I saw that somewhere as a lasagna recipe title and I had to throw it in for fun.  Whoever wrote that was pretty darn full of themselves. I guess they thought “meat lasagna recipe” sounded too boring.  Haha  Anyway, I hope you enjoy my “simple” beef and cheese lasagna recipe.  Di  😉

Meat and Cheese Lasagna

Classic Beef and Cheese Lasagna

Do you want to see more Lasagna Recipes or Italian Recipes?  Go to the comments section for this Recipe on YouTube  and Request a recipe or leave me a comment!  What you’re craving could be my next recipe! You may also like a few of my other pasta recipes: Vegetable Lasagna RecipeSpinach and Cheese Stuffed Shells Recipe,  Bolognese Sauce Recipe, or my Spaghetti Carbonara Recipe.  I also have a Quick Marinara Sauce Recipe for those busy weeknight meals, you may enjoy!

Watch The Video!

Learn How To Make Beef and Cheese Lasagna! Recipe by: Diane Kometa

*SUBSCRIBE HERE*

Subscribe to my YouTube Channel!

Get updated when I release New Recipes!  It’s Free! Do It! 

Don’t Miss An Episode!


Shortbread Cookies

Decorated Shortbread Cookies

Shortbread Cookies Recipe

Shortbread Cookies From Scratch! Learn How To Make Shortbread Cookies – Scottish Shortbread (biscuits).  Easy to follow, step by step recipe with video demonstration for rich, tender, buttery shortbread cookies with melted chocolate (Royal Shortbread) and icing.  Beautiful Decorated Shortbread Cookies! Perfect Cookies for Christmas or for any Holiday!

Shortbread cookies are simple, sweet and tender, buttery cookies. I add vanilla extract to the batter, which gives the cookies a lovely vanilla flavor. With varying shapes, “cut out” Shortbread Cookies are delicious plain or decorated with a sprinkle of colored sugar, but I think they are best when coated or dipped in melted chocolate, which is known as Royal Shortbread.  They are also quite good covered with icing, glaze or frosted with Royal Icing. Royal Icing is quick and easy to make at home and is ideal for decorating sugar cookies and shortbread cookies.

Make Christmas cookies and cut out stars or snowflakes, make shortbread hearts for Valentine’s Day, eggs for Easter, scary cookies for Halloween or just make simple round shortbreads and enjoy these rich, delicious cookies.  You will learn step by step, how to make these simple cookies: how to make the cookie batter, roll the shortbread cookie dough, cut the dough into shapes, bake the cookies and then decorate them.  I make a simple icing (glaze) and also coat the cookies in melted chocolate.  Keep it simple or get creative and make beautiful decorated cookies.  Simple, old fashioned shortbreads are baked in a pan and cut into wedges, (petticoats, petticoat tails ) or cut into small rectangles called “fingers” and of course, they can also be dipped in chocolate.  Mmmm.  We’ll make those another day.

Decorated Shortbread Cookies

Shortbread Hearts

With simple ingredients, create beautiful cookies for Christmas, New Year’s Eve, Easter, a baby shower or any holiday. Bake along with me and learn how to make Shortbread Cookies! Classic, traditional holiday cookies at their best. A nice edible holiday gift idea.  Simple, delicious, beautiful cookies!  One of my favorite cookies recipes, especially with a cup of tea!  Enjoy!  Di  😉

Do you want to see more Cookie Recipes or Dessert Recipes!  Go to the comments section for this Recipe on YouTube  and Request a recipe or leave me a comment!  What you’re craving could be my next recipe! You may also like my Chocolate Chip Cookies Recipe , Classic Peanut Butter Cookies or my Cut Out Sugar Cookies Recipe.  I also have a Shortbread Crust Recipe for tarts and pies you may enjoy!

Watch The Video!

Learn How To Make Shortbread Cookies! Recipe by: Diane Kometa

*SUBSCRIBE HERE*

Get updated when I release New Recipes!  It’s Free! Do It! 

Don’t Miss An Episode!

Peanut Butter Cookies

Classic Peanut Buter Cookies

Peanut Butter Cookies

Peanut Butter Cookies Recipe!  Learn how to make a Peanut Butter Cookies Recipe From Scratch!

Peanut Butter Cookies are an American, classic cookies recipe. I first made the Betty Crocker peanut butter cookies recipe many years ago, which is made with shortening (Crisco, lard) and butter.  I prefer making my peanut butter cookies without shortening and simply use butter,  as butter adds more flavor  to the cookies and everyone knows everything is better with butter anyway, right?   I  use creamy peanut butter  ( JIF has the best peanut butter flavor – and they didn’t even pay me to say that!), but you can use crunchy peanut butter.  The cookie dough needs to be refrigerated before baking, but the good news is that it can be made a few days ahead or the cookie dough can be frozen for about 2 months and then defrosted in the refrigerator.  For soft and chewy peanut butter cookies, simply bake the cookies a little less and for more crisp peanut butter cookies (my preference) bake them a little longer.  Either way, peanut butter cookies are the best, especially with a cold glass of milk!

So, cook along with me and learn how to make an old fashioned, classic peanut butter cookies recipe from scratch with my easy to follow recipe and video demonstration.

Want to see more Cookie Recipes or Dessert Recipes!  Go to the comments section for this Recipe on YouTube  and Request a recipe or leave me a comment!  What you’re craving could be my next recipe! You may also like my Chocolate Chip Cookies Recipe or my Cut Out Sugar Cookies Recipe.

Watch The Video!

Learn How To Make Peanut Butter Cookies! Recipe by: Diane Kometa

*SUBSCRIBE HERE*

Subscribe to my YouTube Channel!

Get updated when I release New Recipes!  It’s Free! Do It! 

Don’t Miss An Episode!

Crepes Recipe

Crepes

Crepes Recipe

Crepes Recipe!  Learn how to make Crepes! With Nutella! Crepes are thin French pancakes and making crepe batter at home is easy in a blender!  You don’t even need a crepe pan or crepe maker to make homemade crepes.  I prefer to use a non-stick pan for making crepes and I get perfect crepes every time!  Crepe batter can be made in advance and refrigerated for a few days.  Or, the crepes can be wrapped and stored in the refrigerator for a few days and then reheated in a non stick pan, so crepes are the perfect make ahead recipe.

Sweet crepes are best for dessert or for breakfast.  Basic sweet crepes are made with eggs, milk, water, flour, sugar, butter, salt and vanilla for flavor.  They can be filled with Nutella and strawberries,  jam (strawberry, raspberry), preserves (apricot, strawberry and raspberry), bananas or other sliced fruits, custards and fruit spreads or whatever you like. For simple sweet crepe fillings, try strawberry banana Nutella crepes or crepes with Nutella and raspberry jam, topped with whipped cream and chocolate syrup, chocolate sauce or with more Nutella! Mmm. Ya gotta love crepes!! Topping crepes with ice cream, chocolate sauce, fruit sauces (blueberry, strawberry and raspberry) or whipped cream makes a perfect dessert.  Whatever crepe filling or topping you choose, when you make these delicate crepes at home, you will feel like you are eating street food from a little café style restaurant in Paris!  Roll them, fold them, fill them or top them.  Crepes are simple and delicious, delicate and thin French pancakes that everyone will enjoy!

I first learned how to make crepes from watching Julia Child years ago. Crepes are made all over the world, not just in France. In Japan, Indonesia, Italy, England, Russia, and in the Philippines, sweet and savory versions of crepes are made.

Note: Crepes can be made by hand, in a bowl, with a whisk, but I have always found lumps and had to strain the batter. This is why I prefer to use a blender. Making crepe batter in a blender creates a silky, smooth crepe batter, without lumps. The perfectly cooked crepes are soft and tender, proving that you don’t have to be a chef to make great crepes! By far, the easiest way to make crepes; a foolproof recipe.

So, cook along with me and make homemade crepes from scratch with my easy to follow recipe and video demonstration.

Want to see more Breakfast Recipes or Dessert Recipes!  Go to the comments section for this Recipe on YouTube  and Request a recipe or leave me a comment!  What you’re craving could be my next recipe! You may also like my French Macarons RecipeHomemade Pancakes Recipe (American Pancakes) and Blueberry Pancakes Recipe.

Watch The Video!

Learn How To Make Crepes! Recipe by: Diane Kometa

*SUBSCRIBE HERE*

Get updated when I release New Recipes!  It’s Free! Do It! 

Don’t Miss An Episode!

Stuffed Mushrooms

Stuffed Mushrooms

Stuffed Mushrooms

Stuffed Mushrooms Recipe!  Learn How To Make a Delicious, Quick and Easy Stuffed Mushrooms Recipe, that can be Made Ahead!  Stuffed mushrooms make the perfect appetizers or simple side dish and anything made with garlic and cheese is good in my book!   Mmmm.  I hope you enjoy this Easy Stuffed Mushrooms Recipe!

Stuffed Mushrooms

Stuffed Mushrooms

Make my Recipes and Share a pic with me on my Facebook Page! Show off your FAB cooking and baking skills!

Want to see more Appetizer Recipes or Snack Recipes!  Go to the comments section for this Recipe on YouTube  and Request a recipe or leave me a comment!  What you’re craving could be my next recipe!

Watch The Video Recipe!

Learn How To Make Stuffed Mushrooms!  Recipe by: Diane Kometa

*SUBSCRIBE HERE*

Subscribe to my YouTube Channel!

Get updated when I release New Recipes!  It’s Free, so do it! 

Don’t Miss An Episode!


Carrot Cake Recipe

Moist Carrot Cake Recipe

Carrot Cake With Cream Cheese Frosting

Learn how to make a Carrot Cake Recipe with Cream Cheese Frosting! Rich and Moist Carrot Cake recipe with sweet cream cheese frosting and grated carrot. Plump, golden raisins, with or without nuts, this carrot cake is simply delicious and easy to make!

Nuts (walnuts, pecans, toasted nuts) are optional,  but the tangy and sweet cream cheese frosting is a must!  For a bakery style, easy dessert recipe for Thanksgiving, Christmas, Easter, or a Birthday, or when you just want a moist spice cake with great flavor, carrot cake is the best!  With the cinnamon and nutmeg, applesauce, raisins, carrots, nuts for crunch and a luxurious cream cheese frosting to top it off, carrot cake has it all!  Carrots make this a healthy dessert too!  Well, maybe not so much.  I think the sugar and cream cheese frosting cancel out any health benefits. Lol

This cream cheese frosting is just perfect for decorating and piping decorations.  Believe me, I’m no cake decorating expert, so if I can do it anyone can.  You just have to buy some of those cake decorating tips and if you don’t have piping bags you can just use a disposable plastic food storage bag and cut the corner off. Trust me on this though; if you don’t pipe decorations, it will still look beautiful and more importantly it will taste delicious!  I hope you enjoy this easy Carrot Cake Recipe!  Di 😉

P.S.  Don’t let the length of the written recipe scare you.  I give a lot of details, but the recipe is easy.  Just watch the video and you’ll see.  Also, the cream cheese frosting has a beautiful texture, is not overly sweet and holds up well to piping, as long as it’s not too soft, in which case, you would just cover it and pop it in the fridge for bit to chill and then get back to decorating.

Moist Carrot Cake Recipe

Carrot Cake With Cream Cheese Frosting

Request a Recipe!  Want to see more Dessert Recipes or Cake Recipes?  Go To this Recipe on YouTube or my Facebook Page to Leave a Comment!  What you’re craving could be my next recipe!

Watch The Video Recipe!  

Learn How To Make Carrot Cake With Cream Cheese Frosting! 

Recipe by: Diane Kometa

*SUBSCRIBE HERE*

Get updated when I release New Recipes!  It’s Free! Do it! 

Don’t Miss An Episode!

Twice Baked Potatoes Recipe

Twice Baked Potatoes
Twice Baked Potatoes with Bacon and Cheese!  Yes Please!

Learn how to make Twice Baked Potatoes!  It’s EASY! Double baked potatoes stuffed with bacon and cheese! Creamy, cheesy potatoes, loaded with flavor! The Ultimate Twice Baked Potatoes Recipe!   Twice cooked and TWICE as delicious as regular baked potatoes or mashed potatoes! 😉

Russet or Idaho potatoes are baked in the oven and then mashed and mixed with milk and butter AND with sour cream! Then, the delicious creamy mashed potatoes are loaded with cheese AND bacon AND onions! Look out!  These loaded mashed potatoes are then stuffed back into the potato skins, topped with MORE cheese and bacon and cooked in the oven AGAIN, until they the cheese is melted and bubbly!  I top them with a few more green onions, so they look xtra delicious, but they don’t need any help! Creamy, cheesy potatoes with crispy bacon and onions Twice Cooked to perfection! The ideal side dish recipe for dinner or a special occasion!  Perfect for Thanksgiving, Christmas, New Year’s, Father’s Day or anytime you need one of those delicious side dishes that is just over-the-top!   OR make twice baked potatoes for lunch on a cold day with a hot bowl of soup.  Mmmm.  Deeelicious! Reheated leftovers are great for snacks (if there are any)!  

Enjoy! Di  😉 

P.S.  You may also like my Loaded Baked Potato Casserole – Salad! It’s also Twice-Baked and can be served hot or cold! Click Here for the recipe -> Loaded Baked Potato Casserole – Salad

Look at that!  Are you drooling?  I know I am! 

Twice Baked Potatoes With Bacon And Cheese
The Ultimate Twice Baked Potatoes

Make my Recipes and Share a pic with me on my Facebook Page!

Show off your FAB cooking skills!

Want to see more Easy Side Dishes or Potato Recipes!  Go to the comments section for this Recipe on YouTube  and Request a recipe or leave me a comment!  What you’re craving could be my next recipe!

**All recipes are tested  – sometimes over and over again 😉

Watch The Video Recipe!

Learn How To Make Twice Baked Potatoes!  Recipe by: Diane Kometa

*SUBSCRIBE HERE*

Subscribe to my YouTube Channel!

Get updated when I release New Recipes!  It’s Free, so do it! 

Don’t Miss An Episode!

Chocolate Cupcakes with Chocolate Ganache Frosting

Chocolate Cupcakes with Chocolate Ganache Frosting

Chocolate Cupcakes with Chocolate Ganache Frosting

Rich and Moist Chocolate Cupcakes with Chocolate Ganache Frosting! One of my Best, Easy to Make, from scratch recipes for Chocolate Cupcakes filled with Chocolate Flavor!  Simple, Homemade Chocolate Cupcakes that are just Delicious! A Decadent Sweet Treat!  Add Decorations for a bakery style dessert served at home for any Occasion! In the video recipe tutorial, I share some simple ideas on how to decorate cupcakes for any occasion.  You can see from my cupcake photos that these cupcakes can look cute or elegant.  Making these cupcakes perfect for birthday parties, or even for weddings.  Be creative or keep it simple!  Cupcakes are just fun!  Why make one chocolate cake, when you can have lots of little individual chocolate cakes!

I made and decorated these chocolate ganache cupcakes in no time. So, grab yourself some icing decorations for cakes and cupcakes, sprinkles, candy, dried fruit or nuts or whatever you’d like and customize these cupcakes for any holiday or special occasion.  Or, don’t decorate them at all!  The dark, smooth and shiny chocolate ganache makes a beautiful presentation on its own.  Simple and delicious! You don’t have to go to the bakery for delicious and beautiful desserts!

Chocolate Cupcakes with Chocolate Ganache Frosting

Chocolate Cupcakes with Chocolate Ganache Frosting

Now, this is not quite a devil’s food cake batter, but I felt like I was doing something really bad when I was eating these moist chocolate cupcakes with their rich chocolate ganache icing, so they do fit the bill in that way!   Moist and rich, but tender and light at the same time and the chocolate ganache has just the perfect amount of sweetness. That’s what love about these cupcakes.  They’re not overly sweet or too moist either, which can be a bit sickening.  I want to feel like I’m eating cake and I don’t want just one or two bites and be done with it, because it’s too rich. That’s what fudge is for, right?

To deepen the chocolate flavor, I used the old trick of adding hot coffee to the batter, which also helps the cocoa powder dissolve or bloom, as they say, for a more chocolaty tasting cupcake.  Btw, I’ve been going back and forth with the spelling: chocolatey or chocolaty?  I’ve seen both and the from what I’ve read both are correct, but spell check seems to disagree and doesn’t like the “e”.  Anyway, I also used some pure vanilla extract to enhance the chocolate flavor a bit too.  I read that good-quality pure vanilla extract can enhance the flavor of chocolate and other flavors and that imitation vanilla doesn’t work as well when it comes to flavoring cakes.  Just a tidbit of info for you to add to the confusion of baking.  So then, to add a moist richness to the cupcakes, in this recipe I use melted butter, as opposed to vegetable oil.  The butter just does a better job in the flavor department, although the oil generally keeps cakes fresh longer.  No matter to me though, because these babies don’t last long enough to get anywhere near stale.  You can trust my scale on that one.  Look at them!  I bet you’re drooling a little right now.  I know I am.  Just go make them!  Enjoy! Di  😉

Chocolate Cupcakes with Chocolate Ganache Frosting

Tender, Rich and Moist Chocolate Cupcakes with Chocolate Ganache Frosting

Want to see more Easy Dessert Recipes?  Cake and Cupcake Recipes?  Go to this Recipe on YouTube  or my Facebook Page and Request a Recipe OR Leave a Comment! What you’re craving could be my next recipe!

**All recipes are tested 😉

Watch The Video Recipe Tutorial!

Learn How To Make Chocolate Cupcakes with Chocolate Ganache Frosting  Recipe by Diane Kometa

*SUBSCRIBE HERE*

Subscribe for the Latest Recipes!  It’s FREE!  Do It!

Don’t Miss An Episode!

Spaghetti alla Carbonara – Pasta Carbonara

Carbonara Sauce

Spaghetti alla Carbonara – Pasta Carbonara

Spaghetti Carbonara: Pasta Carbonara or alla Carbonara is an easy Italian pasta recipe. Learn how to make this simple and easy classic pasta dish, Spaghetti alla Carbonara.  Quick, Easy and Delicious!

The original Italian recipe for Spaghetti alla Carbonara is made with eggs and/or egg yolks, not with cream or milk. A mixture of eggs, cheese and fresh black pepper cooks in the hot pasta to make a creamy carbonara sauce, although cream is often used to add to the creamy texture. My husband likes this pasta dish with cream, so I’ve included a little heavy cream in my recipe, but it’s optional.  The pasta used is usually spaghetti, but I prefer to use angel hair, although some like their carbonara with fettuccine or rigatoni.

Traditional Spaghetti alla Carbonara is said to be best when made with guanciale, which is a salt-cured pork jowl or pork cheek.  This pasta dish is also made with pancetta, an Italian cured belly of pork.  Pancetta is widely used, but is not considered as flavorful  as the traditional guanciale.  Bacon or slab bacon is also used when pancetta  is not available, but is also preferred by many. For the cheese, pecorino cheese, Parmesan or a combination can be used .  Chef Lidia Bastianich, who specializes in Italian and Italian American cuisine, uses slab bacon as well as chicken stock and onions, so the original Italian recipe is often changed to suit individual tastes.  I use a little finely minced  garlic for added flavor and even make carbonara with prosciutto, chicken or with peas.  So, I’m not claiming this is a “real” authentic spaghetti carbonara , but it’s simply my spin on a classic recipe.  Whether you’re making spaghetti and meatballs, Bolognese sauce, a simple tomato sauce, or any classic recipe, Italian or otherwise, it’s ok to put your own spin on it.  Professional chefs like Jamie Oliver, Mario Batali and Gordon Ramsay make their version of traditional recipes, so if you have ideas for making your own dishes go for it!  Don’t have all the ingredients?  Use what’s in your fridge!  Some of the best recipes are made from simple ingredients, just like this Italian pasta dish.  So, watch my video and learn how to make this quick and easy Spaghetti Carbonara Recipe.  It’s a great Italian pasta recipe!

Carbonara Sauce

Spaghetti alla Carbonara – Pasta Carbonara

Want to see more Easy Pasta Recipes or more Quick and Easy Recipes?   Request a recipe or leave me a comment! Go to the comments section for this Recipe on YouTube or visit my Facebook Page!        What you’re craving could be my next recipe!

If you like this Spaghetti Carbonara Recipe, you may also like my Vegetable Lasagna Recipe, or my Stuffed Shells with Spinach and Cheese!   I also have a Quick Pasta Sauce Recipe perfect for easy weeknight meals when you’re in a pinch.  So browse around my site and then get in the kitchen and make something delicious!

**All recipes are tested  – sometimes over and over again LOL

Watch The Video Recipe Demonstration!

Learn How To Make Spaghetti Carbonara – Pasta Carbonara                     Recipe by: Diane Kometa

*SUBSCRIBE HERE*

Subscribe for FREE to Dishin’ With Di’s YouTube Channel for the latest recipes!

Don’t Miss An Episode!


Caramel Sauce – Salted Caramel Sauce


Caramel Sauce - Salted Caramel Sauce

Homemade Caramel Sauce

Classic Caramel Sauce Recipe and Salted Caramel Sauce! Easy recipe with step by step instructions to make sweet caramel sauce at home! Perfect for cakes, brownies, ice cream, cupcakes, cheesecake and drinks! Great in Salted Caramel Hot Chocolate or Caramel Macchiato!

Caramel Sauce - Salted Caramel Sauce

Homemade Caramel Sauce

This traditional caramel sauce is known as a wet caramel sauce, since it is made with water ( wet-method caramel).  Dry caramel sauce is made without water (dry-method caramel).  This classic caramel sauce recipe is made with white granulated sugar, heavy cream, vanilla butter and salt.  Salted caramel sauce simply has more salt and sea salt or kosher salt is preferred.  A traditional caramel sauce is not made with brown sugar, which is usually found in a quick caramel sauce recipe or a butterscotch sauce recipe.  Butterscotch and caramel sauce have similar ingredients and flavors, but the molasses in brown sugar adds a slightly different type of richness. Caramel sauce can also be made with milk, but this is not the preferred method to achieve the rich flavor and thick, creamy  texture that making it with heavy cream provides.  So, what makes regular caramel sauce become a salted caramel sauce? i It’s simply more salt.  The preference is sea salt or kosher, as they provide a nice salty flavor without the harsh edge that table salt has.  You really should do a taste test.  If you use a low sodium salt or salt substitute you will really see a huge difference, as they have almost a chemical-like taste when compared to sea salt or kosher salt.

Recipe Advice

My advice in making this caramel sauce is to be patient and prepared.  Do not use a non-stick pot, as some may not be able to withstand the heat that is produced in making the caramel and the surface may be damaged.  Were’ talking around 350 degrees F – give or take – I never use a thermometer, so I’m not exactly sure.  Just use a heavy bottomed pot and be sure your it isn’t too small.  I used a 2 quart pot in the video, which seemed to work well.  This is important, because at one stage the scalding hot mixture foams up and could boil over onto your stove, counter or you!  It’s extremely hot and serious burns could result, not to mention a miserable clean up.  Also, do not stir the liquid until after the cream has been added.  When you pour the water into the pot over the sugar,  it will eventually get absorbed.  You will only need to swirl the pan occasionally, once the liquid begins to boil.  When you do stir, after the cream is added, be sure you’re using a heat proof sturdy spoon or spatula.  I used a silicone spatula that is safe up to 450 degrees F, so if you’re not sure if something is heat proof, don’t use it or it could melt in the pot!  Not a good thing and could totally ruin your day!  Anyway, have all of your ingredients ready and don’t walk away from the stove once the mixture begins to boil.  It does take several minutes to achieve a deep amber color, but you do need to swirl the pot occasionally to be sure the mixture is cooking evenly and you also need to wash the sides of the pot down with a pastry brush moistened with some water to keep the sugar from crystalizing on the sides of the pot.  You also don’t want to risk burning the mixture, which can happen fast once the color starts to change and will leave the sauce with a burnt taste.  You will start to smell it when it begins to change color, which means swirl and keep a close on it.  My recipe states medium-high heat, but I do want to point out that if you don’t have your heat high enough the liquid will never change color.  Trust me, it happened to me when I first made this sauce and followed a recipe stating to use medium to medium-low heat.  The water will eventually evaporate and you’ll be left with a hard clump of sugar in the pot and a sticky mess to clean up. You will have essentially made hard candy.  Not what you’re looking for.  So, don’t be afraid to turn the heat up to medium-high.  This caramel sauce is not difficult to make,  if you simply follow my directions and watch the video.  I’ve made this plenty of times and made all of the mistakes for you, so everything should be fine.   ;)

Homemade caramel sauce is ideal for recipes like caramel apple pie, salted caramel brownies or copycat Starbucks Salted Caramel Hot Chocolate or Caramel Macchiato. It’s also the perfect sauce  for topping desserts, especially ice cream or New York Cheesecake.    I have recipes for all of those and lots more, so stay tuned!  Thanks for stopping by and for watching!  Di  ;)

Caramel Sauce - Salted Caramel Sauce

Homemade Caramel Sauce

Want to see more Dessert Sauce Recipes or  Salted Caramel Recipes?   Request a recipe or leave me a comment! Go to the comments section for this Recipe on YouTube or visit my Facebook Page!        What you’re craving could be my next recipe! 

If you like this Homemade Caramel Sauce Recipe, you may also like some of my Chocolate Ganache Recipe, which is the perfect filling for my French Macarons!   So browse around my site and then get in the kitchen and make something delicious!

**All recipes are tested  – sometimes over and over again LOL

Watch The Video Recipe Demonstration!

Learn How To Make Caramel Sauce and Salted Caramel Sauce!               Recipe by: Diane Kometa

*SUBSCRIBE HERE*

Subscribe for FREE to Dishin’ With Di’s YouTube Channel for the latest recipes!

Don’t Miss An Episode!


Cinnamon Rolls Recipe

Cinnamon Buns

Cinnamon Rolls

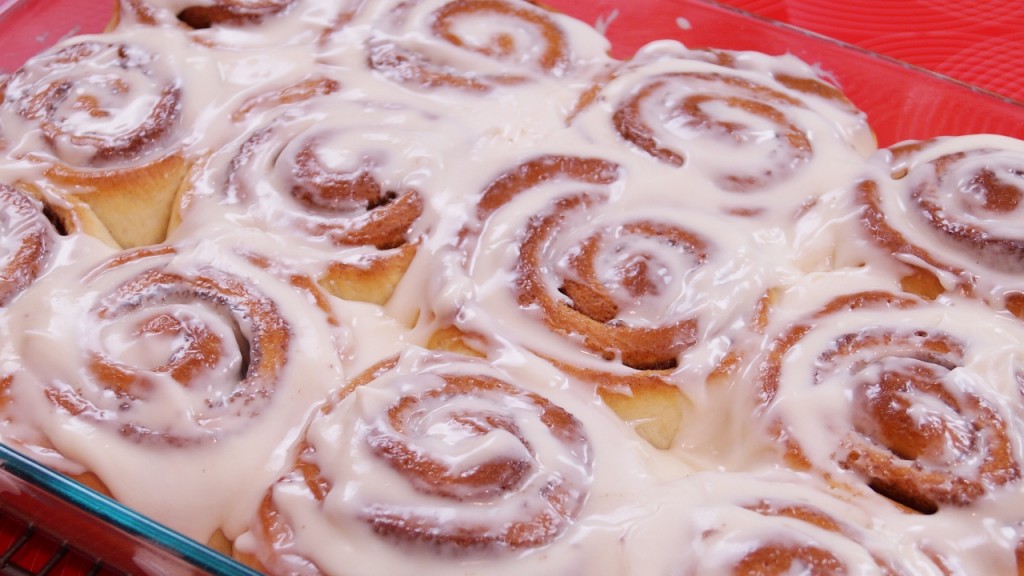
Cinnamon Rolls (Buns) Recipe!  Learn how to make the Best Cinnamon Rolls From Scratch with my Easy to follow Step-By-Step Recipe and Video!  These bakery style Cinnamon Rolls (Buns) are sweet, tender, big, rich and filled with cinnamon sugar and butter, then topped with cream cheese frosting (icing).  If you like the famous Cinnabon Rolls or the Main Street Bakery Cinnamon Rolls at Magic Kingdom in Disney World, then you should try these homemade buns! I’m not saying they’re like those, but they are darn good and can compete with any bakery style cinnamon roll recipe.  They’re Simply Delicious! Dessert for Breakfast! Mmmm

Note: These Cinnamon Rolls are made with yeast and with milk.  I use a stand mixer with a dough hook and paddle to make the dough, but it can easily be made by hand.

Try to stop drooling at the pictures long enough to read the directions and watch the video before you make these cinnamon rolls.  This is not a difficult recipe!  Actually, it’s pretty easy.  It’s really like making a cake or any other batter, but the difference is that the dough just needs time to rise.  It’s not a bad thing, since it gives you time to clean up and then you can go do something else or watch some of my other videos while you wait.  I was a little camera-shy in the beginning, so be kind if you watch the older ones.  So anyway, as with any recipe, be sure to get all of your ingredients measured before you start and watch the video as you go through the recipe, that way it will seem like we’re baking in the kitchen together!  Good luck and be sure to take a photo of the completed recipe and post it to my Facebook Page or other social media.  I just love seeing people recreating my recipes.  It warms my heart.  Enjoy!  Di  😉

Btw, if you don’t want to put the cream cheese frosting on the rolls, I can tell you from experience they  taste great with some butter.  I like to unravel them, spreading butter on each piece as I go along.  Take a look at this photo below and tell me you can’t imagine doing the same exact thing!  You better get busy and start baking!

Cinnamon Buns

Cinnamon Rolls

Important Recipe Info!  Please Read!

In this recipe you will be scalding the milk.  It’s really easy so don’t get nervous .  Scalding is simply heating the milk to 180-190 degrees F, which is basically about the time it starts to simmer.  So, why scald the milk?  Because some milk proteins unfold from their native chain or globular shape at scalding temperatures.  I know this sounds like science class, but it’s pretty interesting stuff.  Anyway, this unfolding is known as denaturing proteins. The denaturing helps in bread making, (cinnamon rolls are made with sweet yeast bread), resulting in a better rise and a finer crumb.  Light and tender cinnamon rolls!  Yay!   So, why not just use water instead of milk?  Good question!  Milk solids make the gluten connections in the dough slightly weaker.  This creates bread with a more tender crumb and a mellower taste.  So, by using scalded milk these cinnamon rolls will be light, tender and delicious!

How to scald milk:  You can do this on the stovetop in a small pot or in the microwave, in a large cup.  I’ve done it both ways and I prefer the microwave using a glass measuring cup.  I have to measure the milk anyway, so it saves me on clean up.  So, you just pop the milk in the microwave on high and then heat it for about a minute and give it a stir and then heat again at about 45 second intervals, until the milk gets to 180-190 degrees F.  It’s best to use a thermometer to check the temperature, but you can tell when it’s scalding, because it will get very hot and steamy and tiny bubbles will start forming around the edges of the cup.  It also starts to form a bit of a skin. Now be careful, because it starts to boil soon after scalding, so be sure to keep an eye on it, so that doesn’t happen.  Be very careful when you remove the cup from the microwave, as it may become very hot. If you scald the milk on the stove, place a small pot over medium heat and stir the milk constantly, to prevent it from sticking to the bottom or scorching. Don’t get impatient and turn the heat up because you will definitely scorch it. Once you’ve scalded the milk in the pot, place it into a heatproof cup, like a glass measuring cup, so it can cool down.  So now you know how to scald milk in the microwave and on the stove. Yay!  I can feel your excitement.  You can check that one off of your list now!  Lol

About the Flour

You will need to adjust the amount of flour to make the dough according to the environment in your home. Here’s a quick look at what to expect.

If the air is dry, the flour will be dry.

If the air is humid, the flour will absorb the moisture in it.

(Note: In the video I say the “temperature” of the flour and of your home, but I meant humidity)

Dry flour is like a dry sponge, which can soak up more water than a wet sponge. That means, that during cold, dry months, less flour is needed to make a dough and in hot, humid months, more flour is needed.

Start with the least amount of flour and if you need more, than add one tablespoon at a time, kneading thoroughly after each addition.  I do this by first measuring the least amount of flour (5 1/4 cups poured and leveled (21 oz. or 615 grams) and then I put the difference in a small bowl, which is usually several tablespoons.  This way you’re not just going to randomly dump flour into the dough and you’ll know if you’re about to exceed the maximum amount of dough stated in the recipe (660 grams or 23 oz. – 5 2/3 cups poured and leveled). Too much flour can make the rolls dry. Sometimes I take the dough out of the mixing bowl and knead by hand, when I feel like it’s getting close.  That way I can feel the doughs’ texture and elasticity, which lets me know if I should add more flour or not.  Make notes regarding the amount of flour used and the weather conditions at the time – was it a humid summer day, was it raining, was it winter and the air dry from using the heater.  This will help you text time you make the recipe. The dough hook on these mixers isn’t the best and it may just take a minute or two of hand kneading to get it to come together. That’s why I use the paddle attachment to get the dough ingredients combined in the beginning.  Well, good luck and be assured that even if these rolls aren’t absolutely perfect on your first try, they will still be incredible!  Trust me!  I’ve made many batches and have always received rave reviews, even when I knew I messed up.  People are just really excited and impressed when you make homemade cinnamon rolls! It’s not an everyday occurrence for them.  So, have fun and get a pot of coffee going, so when these babies are done, you can just dig in, because they are the absolute best,  fresh out of the oven.  Di

Cinnamon Buns

Cinnamon Rolls

Want to see more cinnamon bun recipes or sweet roll recipes?  Or how about Sticky Buns, Monkey Bread or even Cinnamon Raisin Bread?  Request a recipe or leave me a comment!  Go to the comments section for this Recipe on YouTube or visit my Facebook Page!  What you’re craving could be my next recipe! 

If you like these Homemade Cinnamon Rolls, you may also like some of my other breakfast, bread or dessert recipes! (Especially my Coffee Cake Recipe!)  So browse around my site and then get in the kitchen and make something delicious!

**All recipes are tested  – sometimes over and over again LOL

Watch The Video Recipe Demonstration!

Learn How To Make Cinnamon Rolls (Buns)!  Recipe by: Diane Kometa

*SUBSCRIBE HERE*

Subscribe for FREE to Dishin’ With Di’s YouTube Channel for the latest recipes!

Don’t Miss An Episode!


Soft Pretzels Recipe

Soft Pretzels Recipe

Homemade Soft Pretzels

Soft Pretzels Recipe!  Learn how to make the BEST Soft Pretzels recipe from scratch!  Making homemade Soft Pretzels at home is EASY with my simple step-by-step video recipe.    My homemade soft pretzels recipe is more like traditional, authentic German soft pretzels or Bavarian pretzels, also known as Laugenbrezel.  Classic soft pretzels are a very popular during Oktoberfest. Some soft pretzel recipes use lye or food grade lye to achieve the dark brown color and malt for flavor.  In my soft pretzel recipe, I replaced the lye with baking soda and used dark brown sugar for flavor. All of my taste testers agreed  the flavor and texture were wonderful.   The pretzel dough is made with yeast, so it’s just like making bread dough or pizza dough at home. Simple! Once baked, hot pretzels are soft and chewy on the inside and a little crispy on the outside. Homemade Soft Pretzels make the best snacks and are great for any football or Super Bowl party and they’re low in fat! Serve them warm with mustard or with cheese sauce. Every pretzel is good to the last bite! Mmmm  

So, I started thinking about making soft pretzels, because my brother-in-law has been buying a bag full of Philly soft pretzels, with cheese sauce for dipping, every weekend from the Philly Pretzel Factory.  Those are the same pretzels sold from carts on the streets of Philadelphia, New York and many other locations. My pretzel recipe, as I mentioned, is more like German-style soft pretzels, while a Philly soft pretzel is much more doughy and barely lightly browned.  A classic Philly soft pretzel is traditionally served topped coarse salt and mustard, but nowadays there are a variety of toppings. A favorite is Philly soft pretzels topped with melted butter and coated with cinnamon sugar, just like Auntie Anne’s soft pretzels.  Auntie Anne’s pretzels, aka Mall Pretzels, are lighter, more sweet and buttery pretzels that you can typically find for sale in your local large shopping mall, if you live in the US. They are quite popular and you can usually tell there’s one in your mall, by the long line formed in front of the store. There’s usually an employee standing out front with a tray of samples.  I walk by 2 or 3 times. Lol  😉  Anyway,  I guess the Philly pretzel factory had to keep up with the trend and fancy up their toppings to be more like Auntie Anne’s.  I love them both, but honestly there’s nothing like a homemade soft pretzel right out the oven and there’s some really satisfying about knowing that you made it yourself. They’re really good and so easy to make. I hope you enjoy them as much as I do!

Want to see more pretzel recipes like pretzel bites, cheese filled pretzels, pretzel rolls? Request a recipe or leave me a comment!  Go to this Recipe on YouTube or visit my Facebook Page!  What you’re craving could be my next recipe!   

If you like these Homemade Soft Pretzels, you may also like my Corn Dogs Recipe or my other appetizer and snack recipes. Get in the kitchen and make something delicious!  **All recipes are tested

Watch The Video Recipe Demonstration!

Learn How To Make Soft Pretzels! Recipe by:  Diane Kometa


*SUBSCRIBE HERE*

Subscribe for FREE to Dishin’ With Di’s YouTube Channel for the latest recipes!

Don’t Miss An Episode!

Mini Oreo Cheesecakes Recipe

Oreo Cheesecake Cupcakes

Mini Oreo Cheesecakes

Mini Oreo Cheesecakes!  Individual Oreo Cheesecakes with Oreos in the filling and an Oreo cookie crust! Quick and easy to make, these Oreo cheesecake cupcakes are bites of mini cheesecake heaven! Serve them as mini upside-down cheesecakes with the Oreo cookie crust on top or simply top them with sweetened whipped cream and a mini Oreo cookie!  Any way you serve them they are creamy, a little crunchy and just delicious; just like a regular Oreo cheesecake, but without the fuss or the wait! No-bake cheesecakes cannot compare to the flavor and texture of these bite size cheesecakes. They are soo easy to prepare and take only about 20 minutes to bake!  Why bother with a no bake Oreo cheesecake, when you can have the real thing!  Perfect for parties or if you just have a craving for Cheesecake; the perfect dessert!  Enjoy!  Di  😉

Leave them in the liners or put these delicious mini cheesecake cupcakes on individual serving dishes for a beautiful presentation!  When your friends ask what bakery you got these little Oreo cheesecake bites of heaven from, be sure to tell them your friend, Diane Kometa from Dishin With Di, gave you the recipe!

Oreo Cheesecake Cupcakes

Mini Oreo Cheesecakes

They Look soo pretty in these red foil liners.  Perfect for a party and easy to handle!

Oreo Cheesecake Cupcakes

Mini Oreo Cheesecakes

If you like these mini cheesecakes, you may also like some of my other cheesecake recipes and Oreo recipes! So browse around my site and then get in the kitchen and make something delicious!

** All recipes are tested

Want to request a recipe or leave me a comment??                                                                                                    Go to this Recipe on YouTube or visit my Facebook Page!  What you’re craving could be my next recipe!

Watch The Video Recipe Demonstration!

Learn How To Make Mini Oreo Cheesecakes!  Recipe by:  Diane Kometa

*SUBSCRIBE HERE*

Subscribe for FREE to Dishin With Di YouTube Channel for the latest recipes!

It’s Free!  Do It!  Don’t Miss An Episode!

Salmon with Mango Salsa

Grilled Salmon with Mango Salsa

Salmon with Mango Salsa

Learn how to make this grilled Salmon with Mango Salsa!  This is an easy salmon recipe with a flavorful spice rub and fresh fruit salsa.  The fruit salsa is made with fresh mango and pineapple for sweetness, red bell pepper, jalapeno and red onions for a little heated flavor punch and texture variation, and fresh cilantro and lime juice to add a bright freshness.  I prefer grilled or pan seared salmon with skin.  I like the crispy skin and the added texture and flavor it adds to the dish and I also think the skin acts like a little barrier and helps keep the fish moist while cooking, just like when you cook chicken with the skin on. I also allow the skin of the fish to dry out a bit before applying the rub, so it gets extra crispy when it cooks.  I have another little trick I learned to keep the skin from shrinking up when it hits the hot grill, but you have to watch the video for that one. I can’t give away all my secrets yet!  It’s like a little mystery now, isn’t it?  Anywho, I season the fish generously with salt and a homemade spice rub that includes the usual suspects and that really adds a nice smoky spicy kick to the fish, without being too overpowering, but if you like overpowering, don’t let me stop you!  Go ahead and pack it on!  You can cook the salmon on a charcoal or gas grill or use a grill pan or even just a heavy skillet or frying pan.  The key is “heavy”.  You want something that is going to stay hot when the fish hits the pan.  You can pick up a medium-sized cast iron skillet for about 20-25 bucks, which is pretty cheap considering they basically last a lifetime.  With one of those on hand, you can cook your way to straight to Flavortown!  Anyway, watch the video and treat yourself or someone else special and make this recipe!  It’s a delicious as it looks!  Enjoy!  Di  😉

Want more quick and easy recipes for dinner?  Leave me comment! 

Go to this recipe on YouTube   or visit my Facebook Page and let me know what video recipes you’d like see.  What you’re craving could be my next recipe!

Watch The Video Recipe!

Learn How To Make Salmon with Mango Salsa!  Recipe by: Diane Kometa

*SUBSCRIBE HERE*

Subscribe for FREE to Dishin’ With Di’s YouTube Channel for the latest recipes!

Don’t Miss An Episode!

Chocolate Mug Cake

Chocolate Mug Cake Recipe

Chocolate Mug Cake

Learn how to make a Chocolate Mug Cake Recipe! Easy Chocolate Cake in a Mug or Cup in minutes! It’s so fast and simple to make this cake in the microwave and you will not believe how delicious it is!  I’ve many so many different mug cake recipes and finally figured out that you just can’t mix the cake in the mug and expect it to be tender, so that’s why I mix it in a bowl and then pour it in the mug or cups. I know it’s an extra step, but I’m pretty fussy and I would not share a recipe with you that I would not eat myself and would not eat it if I mixed it in the mug, because it comes out really tough and rubbery. Try it out, don’t over mix it and be sue to top it with some ice cream if you can, because it takes this cake to a whole different level!  I will definitely serve it to guests!  It’s that good!  I hope you enjoy this Easy Chocolate Mug Cake Recipe!

AKA – 2 Minute Cake, 5 Minute Mug Cake, 3 Minute Cake, Cake in a Cup, Cup Cake or Cup Cakes for Two, 5 minute desserts, 5 minutes recipes

P.S.  If you like this, you may also like my Molten Chocolate Lava Cakes Recipe!  That’s another easy dessert recipe that’s sinfully delicious!

Want more quick and easy recipes?  Leave me comment! 

Go to this recipe on YouTube  or visit my Facebook Page and let me know what video recipes you’d like see.  What you’re craving could be my next recipe!

Watch The Video Recipe!

Learn How To Make a Chocolate Mug Cake!  Recipe by: Diane Kometa

*SUBSCRIBE HERE*

Subscribe for FREE to Dishin’ With Di’s YouTube Channel for the latest recipes!

Don’t Miss An Episode!